■ Hypervisor: Winsdows Hyper -V
■ OS: CentOS Linux release 7.9.2009 (Core)
■ NW: L3 Switch 2port <-> VM NIC 2port
1. NetworkManager service 완전 중단 (오작동 예방을 위해)
# nmcli c
# systemctl status NetworkManager
# systemctl stop NetworkManager
# systemctl disable NetworkManager
# systemctl status NetworkManager

2. bonding 모듈 적재 작업
# lsmod | grep -i bonding
-> 모듈이 적재 되어있지 않을 경우 하기 명령어로 적재 시켜준다.
# modprobe --first-time bonding
# lsmod | grep -i bonding
bonding 204800 0
# modinfo bonding
-> 모듈 정보 확인 명령어, 필수는 아니다.

3. Network Interface 확인 작업
# ifconfig eth0 ; ifconfig eth1
eth0: flags=4163<UP,BROADCAST,RUNNING,MULTICAST> mtu 1500
inet 172.16.24.20 netmask 255.255.0.0 broadcast 172.16.255.255
inet6 fe80::215:5dff:fe38:107 prefixlen 64 scopeid 0x20<link>
ether 00:15:5d:38:01:07 txqueuelen 1000 (Ethernet)
RX packets 131 bytes 13012 (12.7 KiB)
RX errors 0 dropped 0 overruns 0 frame 0
TX packets 119 bytes 13706 (13.3 KiB)
TX errors 0 dropped 0 overruns 0 carrier 0 collisions 0
eth1: flags=4098<BROADCAST,MULTICAST> mtu 1500
ether 00:15:5d:38:01:08 txqueuelen 1000 (Ethernet)
RX packets 0 bytes 0 (0.0 B)
RX errors 0 dropped 0 overruns 0 frame 0
TX packets 0 bytes 0 (0.0 B)
TX errors 0 dropped 0 overruns 0 carrier 0 collisions 0
-> 기존 네트워크 인터페이스 eth0에 ip설정이 되어있는 것을 확인하고, 새로 추가한 eth1 인터페이스도 확인
-> 필자 같은 경우 eth0과 eth1이 bonding 대상이다.
# ls -l /etc/sysconfig/network-scripts/ifcfg-eth0 /etc/sysconfig/network-scripts/ifcfg-eth1
ls: cannot access /etc/sysconfig/network-scripts/ifcfg-eth1: 그런 파일이나 디렉터리가 없습니다
-rw-r--r--. 1 root root 355 10월 7 15:06 /etc/sysconfig/network-scripts/ifcfg-eth0
-> eth1 nic을 추가했으나 ifcfg-eth1 설정 파일이 없다. eth0을 복사하자.
# cp -ip /etc/sysconfig/network-scripts/ifcfg-eth0 /home/ibmhp011 (롤백을 위한 백업)
# cp -ip /etc/sysconfig/network-scripts/ifcfg-eth0 /etc/sysconfig/network-scripts/ifcfg-eth1
# ls -l /etc/sysconfig/network-scripts/ifcfg-eth0 /etc/sysconfig/network-scripts/ifcfg-eth1
-rw-r--r-- 1 root root 335 10월 7 11:54 ifcfg-eth0
-rw-r--r-- 1 root root 335 10월 7 11:54 ifcfg-eth1

4. Network Interface Bonding 작업
# cd /etc/sysconfig/network-scripts/ifcfg-eth0 /etc/sysconfig/network-scripts/
# vi ifcfg-bond0 ; ls -l ifcfg-bond0 ifcfg-eth0 ifcfg-eth1
DEVICE=bond0
NAME=bond0
TYPE=Bond
IPADDR=172.16.24.20
GATEWAY=172.16.24.1
NETMASK=255.255.0.0
DNS1=1.1.1.1
ONBOOT=yes
BOOTPROTO=none
BONDING_MASTER=yes
BONDING_OPTS="mode=1 miimon=100 primary=eth0"
-rw-r--r-- 1 root root 200 10월 7 14:09 ifcfg-bond0
-rw-r--r-- 1 root root 335 10월 7 11:54 ifcfg-eth0
-rw-r--r-- 1 root root 335 10월 7 11:54 ifcfg-eth1
-> bond0 논리 인터페이스 파일을 만든 다음, eth0에서 쓰던 기존 ip설정을 넣고, bonding 관련 설정을 넣었다. mode=1은 active-standbty 이다. 모니터링 주기는 100ms 이다.

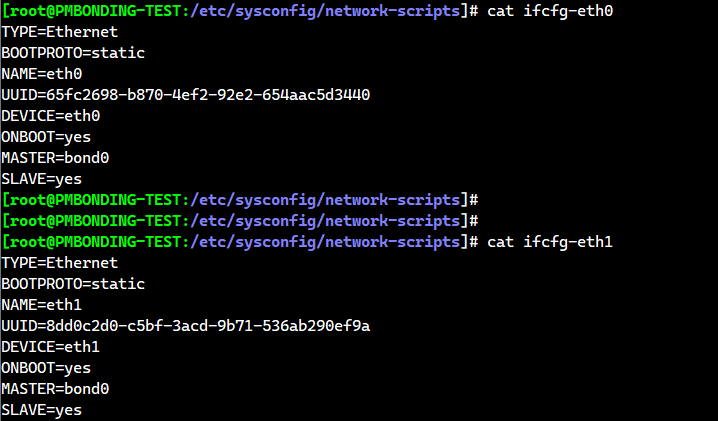
# vi ifcfg-eth0
TYPE=Ethernet
BOOTPROTO=none
NAME=eth0
UUID=65fc2698-b870-4ef2-92e2-654aac5d3440
DEVICE=eth0
ONBOOT=yes
MASTER=bond0
SLAVE=yes
-> eth0의 설정
# vi ifcfg-eth1
TYPE=Ethernet
BOOTPROTO=none
NAME=eth1
UUID=8dd0c2d0-c5bf-3acd-9b71-536ab290ef9a <- 사전에 확인해야한다.
DEVICE=eth1
ONBOOT=yes
MASTER=bond0
SLAVE=yes
-> eth1의 설정
5. Network 서비스 재시작으로 Bonding 적용
# systemctl status network
# systemctl restart network
# systemctl status network

6. Bonding 확인
# ip a | grep -i bond0
2: eth0: <BROADCAST,MULTICAST,SLAVE,UP,LOWER_UP> mtu 1500 qdisc mq master bond0 state UP group default qlen 1000
3: eth1: <BROADCAST,MULTICAST,SLAVE,UP,LOWER_UP> mtu 1500 qdisc mq master bond0 state UP group default qlen 1000
4: bond0: <BROADCAST,MULTICAST,MASTER,UP,LOWER_UP> mtu 1500 qdisc noqueue state UP group default qlen 1000
inet 172.16.24.20/16 brd 172.16.255.255 scope global bond0

# ifconfig ; route -n

# cat /proc/net/bonding/bond0
Ethernet Channel Bonding Driver: v3.7.1 (April 27, 2011)
Bonding Mode: fault-tolerance (active-backup)
Primary Slave: eth0 (primary_reselect always) <- 주 Active 인터페이스
Currently Active Slave: eth0 <- 현재 bonding에서 사용중인 인터페이스
MII Status: up <- 본딩 인터페이스 업!
MII Polling Interval (ms): 100
Up Delay (ms): 0
Down Delay (ms): 0
Slave Interface: eth0
MII Status: up <- eth0 SLAVE 인터페이스 업!
Speed: 10000 Mbps
Duplex: full
Link Failure Count: 0
Permanent HW addr: 00:15:5d:38:01:07
Slave queue ID: 0
Slave Interface: eth1
MII Status: up <- eth1 SLAVE 인터페이스 업!
Speed: 10000 Mbps
Duplex: full
Link Failure Count: 0
Permanent HW addr: 00:15:5d:38:01:08
Slave queue ID: 0

7. Failover 테스트
hyper-v에서 인터페이스 연결을 해지한다.
# watch -d -n 1 "cat /proc/net/bonding/bond0"
-> 연결 해제한 것 중(eth0,eth1) 가 MII Status 상태가 DOWN 된다. failure count도 올라가며, Currently Active Slave가 대기중이었던 인터페이스로 변경된다.
# ping -t 172.16.24.20
-> ping 통신 상태가 끊기지 않을것
※bonding options에서 primary를 eth0으로 지정해주면 eth0에서 장애가 발생할 시 eth1로 failover되어 eth1가 운영 되다가, eth0가 복구되면 자동으로 eth0로 넘어가지만, primary를 지정해주지 않으면 계속 eth1를 사용하여 eth0로 failback 하지 않는다.
'리눅스' 카테고리의 다른 글
| Rocky Linux 9에서 Zabbix 6.0 구축 (0) | 2023.05.20 |
|---|---|
| SAN Storage 개념 정리 (0) | 2023.03.21 |
| PCI슬롯 확인과 HBA Card 확인 명령어 (0) | 2023.03.16 |
| nmcli 명령어 사용법: Rocky Linux 9.1_2 (0) | 2023.03.16 |
| nmcli 명령어 사용법: Rocky Linux 9.1 (0) | 2023.02.27 |

